Each file, process, or drive that is loaded in 010 Editor is placed into a File Tab as shown above. File Tabs can be displayed in the Title Bar of the application or can be displayed in a row above each editor. Change the location of the tabs by checking or unchecking the Show Tabs in Title Bar toggle in the Opening Files/Tabs Options dialog.
A collection of File Tabs in a single line is referred to as a Tab Group. By default all regular files that are loaded are placed into a single Tab Group in the main interface but all Scripts and Templates are loaded into a Floating Tab Group (see the Floating Tab Groups section below).
The currently active File Tab will be displayed as bold and all file operations (save, close, find, select all, etc.) will be applied to that file. Each File Tab displays a shortened version of the full file name but the file name can be viewed in a hint popup by placing the mouse cursor over top of the Tab (the file name of the active file can also be viewed in the status bar). Clicking on a File Tab sets that file as the active file in the application.
To close a File Tab either click the 'x' button on the Tab or click the middle mouse button on the Tab (some computer mice have a scroll wheel and a middle click can be performed by pressing down on the scroll wheel). Alternately, File Tabs can be closed using the 'File > Close' functionality. A popup menu can be accessed by right-clicking on the Tab. From the popup menu, click the 'Close' menu option to close the currently selected file or the 'Close All Except This' option to close all files except the file that is currently selected. Clicking the 'Copy File Path' option will place the full directory path of the current file onto the clipboard. See the File Menu for an explanation of other options on the popup menu.

If too many File Tabs are loaded to be viewed all at once, the File Tabs can be viewed by clicking on the left and right arrows (shown above) to scroll through the tabs. Clicking the down arrow displays a list of all File Tabs in that Tab Group. Another way to scroll through the tabs is to position the mouse over the File Tabs and then roll the mouse scroll wheel forward or backward.
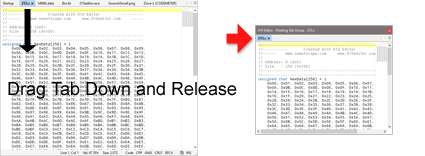
File Tabs may be rearranged by clicking and dragging the tabs to new positions. If the File Tab is dragged far enough the tab will tear off and then may be dropped onto other Tab Groups (see Using Multiple Tab Groups or Tearing Off Tabs below).
Floating Tab Groups

A Floating Tab Group is a floating window that contains a set of File Tabs and can be displayed by clicking the 'View > Floating Tab Groups' menu option. Any file can be moved to the Floating Tab Group by dragging the File Tab to the window and then dropping the Tab, or by right-clicking on the Tab and selecting Move to Floating Tab Group. Multiple Floating Tab Groups can be created by right-clicking on the Tab and selecting Move to New Floating Tab Group or by tearing off a tab as discussed below. Note that the active file for the application will be marked as bold and only one file at a time can be the active file. Hide all Floating Tab Groups easily by pressing the Esc key (the Esc key is also used to hide Output windows). When all tabs in the last Floating Tag Group are closed, the Floating Tab Group will automatically be hidden but this behavior can be turned off using the Editor Options dialog.
By default all Scripts and Templates that are loaded are placed into a Floating Tab Group but they can be set to load into the main interface by using the Opening Files/Tabs Options.
Tearing Off Tabs

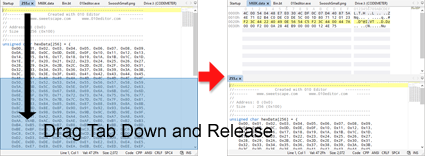
A tab can be torn off by clicking and dragging the Tab up or down until it separates from its Tab Group and then releasing the mouse. This will create a new Floating Tab Group with a single tab. Tab tearing can be disabled using the Opening Files/Tabs Options dialog. If the Tab is dragged on the right or bottom side of a Tab Group until a blue selection area appears then dropping the Tab will create Multiple Tab Groups.
Using Multiple Tab Groups
All Tab Groups in the main interface or a Floating Tab Group can be split into multiple Tab Groups oriented either horizontally or vertically. If a Tab Group has multiple tabs, right-click on a File Tab and select Move to New Horizontal Tab Group to create multiple horizontal Tab Groups. Another way to generate horizontal Tab Groups is to drag a File Tab towards the bottom of the Window until the blue selection area indicates the lower half of the dialog (see the dialog below).

Similarly, multiple vertical Tab Groups can be generated by right-clicking on a Tab and selecting Move to New Vertical Tab Group or by dragging a File Tab to the right until the blue selection area indicates the right side of the window.
Once multiple Tab Groups have been created simply drag a File Tab between the groups. Clicking 'Window > Merge All Tab Groups' will place all tabs into a single Tab Group again. See the Window Menu for more information.
| 


