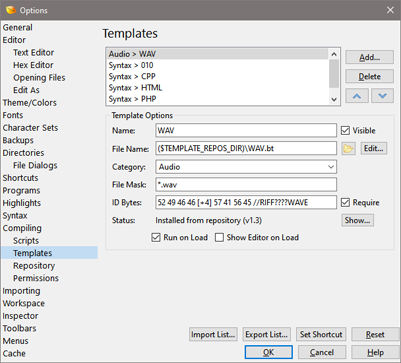
The Template Options dialog lists all Binary Templates that have been installed, either from the local drive or from the 010 Editor Repository. When a Template is installed it is listed on the main Templates menu and can be set to automatically run when certain files are opened. Access the Template Options dialog by clicking the 'Tools > Options...' menu item and selecting Templates, or by clicking 'Templates > View Installed Templates...'.
The upper part of the dialog contains a list of templates displayed in the format 'Category > Template Name'. New templates can be added from the local drive by clicking Add and selecting a template file (note that multiple templates can be added at the same time using the file dialog that is displayed and information such as the Category, File Mask and ID Bytes will be extracted from the file comments). Remove a template from the list by selecting an item and clicking Delete (the file will not be deleted on disk). Click the up or down arrows to arrange the templates in the list.
When a template is selected from the list its attributes are displayed in the Template Options box. Enter a name for the template in the Name field. This name will appear on the Templates Menu listed by Category. If the Category is empty the template will be displayed near the top of the Templates menu. Disabling the Visible toggle allows the template to be hidden from the menu without deleting it. Enter the file name for the template in the File Name field and Binary Templates usually have the extension '.bt'. The folder button beside the File Name field can be used to select a template using a file dialog box. Press the Edit button to close the Options dialog and view the file in the editor.
The File Mask and ID Bytes fields indicate which data files this template can parse. The File Mask field matches the file name of a file and can use the wildcard characters '*' (zero or more matches) or '?' (exactly one match) and can use the comma character to separate multiple masks. For example the File Mask "*.o,?.dylib" would match either "test.o" or "a.dylib". The ID Bytes indicates a set of bytes at the beginning of the data file that the file must contain before the Template is loaded. The bytes are listed in hex notation and the '//' characters indicate the start of a comment which is ignored when matching bytes. The special notation [+DDD] or [+0xHHH] can be used where DDD is a decimal number or HHH is a hex number to skip over bytes in the file. For example the ID Bytes '00 [+4] FF' means the data file must have a '00' byte at the beginning of the file and a 'FF' byte at position 5. Multiple sets of ID Bytes can be specified using commas and only one set of ID bytes needs to match the file (for example '05 00, 04 00'). Currently only the first 2048 bytes in the file are matched against the ID Bytes. If ID Bytes is empty or the Require toggle is unchecked then only the File Mask will be used.
If the template has been installed from the 010 Editor Repository then the Status field lists the version that was installed. Clicking the Show button will hide this dialog and display the Template information in the Repository Dialog. If the Run on Load toggle is enabled, this template will be run automatically when it is loaded. When the Show Editor on Load toggle is set, the template will be opened for editing in the interface.
The following templates are installed by default:
- ZIP - Template used to parse ZIP archives. Loads the 'ZIP.bt' file.
- WAV - Template used to parse a WAV sound file. Loads the 'WAV.bt' file.
- BMP - Template used to parse bitmap files. Loads the 'BMP.bt' file.
Click the Set Shortcut button to jump to the Shortcut Options dialog to set a shortcut key for the selected template. The Reset button can be used to reset all templates to their original values.
Importing and Exporting Lists of Templates
The Template Options dialog can be used to export the current list of templates so that they may be
importing into another copy of 010 Editor. To export the current list of templates click the Export List... button at the bottom right corner of the dialog. Choose
the location to save the template list using the standard file dialog. Exported template lists contain two
things: the list of Template Records (all the information displayed in the Template Options group)
plus the actual template files. Exported template lists have the extension ".1tl".
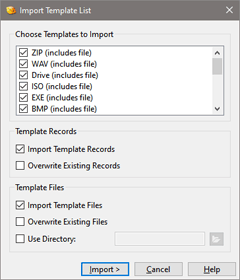
To import an existing template list click the Import List... button. Choose a template list to import and the Import Template List dialog will be displayed.

Choose which templates to import from the list at the top of the dialog. If the Import Template Records
toggle is selected, all the template records are read (a template record includes all information in the
Template Options area of the main Options dialog). By default any existing template records are not
modified but they may be overwritten by enabling the Overwrite Existing Records toggle. If the
file to import contains the actual template files (the text 'includes files' should appear beside
the template name in the list), then the actual template files can be written to disk. Enable Import
Template Files to write the files to disk and enable the Overwrite Existing Files option to
overwrite template files on disk. By default the template will be written to the same directory where it
was exported from but if that directory does not exist on this machine, enable the Use Directory
toggle and choose which directory to place all the template files.
Clicking the Import button will perform the import and will display a Results text area with
information about the import. If any errors occurred while writing files, the errors will be displayed in
the Results. Click the Close or Cancel button to dismiss the dialog. This dialog works
the same way as the Import Script List dialog except the dialog operates on templates instead of
scripts.
| 


