|
The Disassembler tool converts a set of binary bytes into assembly language. Assembly language is a low-level language where each line generally corresponds to a operation that can be done on a machine's CPU, also called an opcode. A disassembler is the opposite of an assembler, which takes assembly language and converts it to binary bytes and this is commonly used in reverse engineering. Disassembly can be done through the Disassembler tool or through a Template or Script as discussed in the Disassembly in Templates help topic. The Inspector can also be used to perform disassembly for a single opcode.

Access the Disassembler tool by clicking 'Tools > Disassembler...' on the main menu or by clicking the Disassembler icon on the Tool Bar. Select which type of architecture to disassemble using the list on the left side of the dialog. Some architectures have options which appear as check boxes in the Options section. The following list indicates which options are available for each architecture:
- X86 (16-Bit): (none)
- X86 (32-Bit): (none)
- X86 (64-Bit): (none)
- ARM (32-Bit): ARM v8, ARM MClass, ARM Thumb Mode, Endian
- ARM (64-Bit): Endian
- MIPS (32-Bit): MIPS Micro, MIPS 32r6, MIPS ii, MIPS iii, Endian
- MIPS (64-Bit): MIPS Micro, MIPS ii, MIPS iii, Endian
- PowerPC (32-Bit): PowerPC QPX, Endian
- PowerPC (64-Bit): PowerPC QPX, Endian
- SPARC: SPARC v9
- SystemZ: (none)
- XCore: (none)
- Motorola 68000: 68010, 68020, 68030, 69040, 68060 (also called m68k)
When an architecture is selected which has Endian as an option then the Little Endian and Big Endian toggles can be used to select the endian used to process the data. See Introduction to Byte Ordering for more information. The default Endian setting when the dialog is opened is the current Endian of the file. Architectures that do not support Endian have the Endian group disabled.
If no bytes are selected when the dialog is opened, the disassembly will be run on the entire file. If a selection is made when the dialog is opened then the disassembly can either be run just on the selection by choosing the Selection toggle or on the whole file by choosing the Entire File toggle. The assembly language produced can either be in Intel syntax (for example, "mov rbx, rcx") or in AT&T syntax (for example, movq %rcx, %rbx). Select which syntax to use by clicking the Syntax drop-down list.
Clicking the Disassemble button performs the disassembly and shows the results in the Disassembler Output Window.
Disassembler Output Window

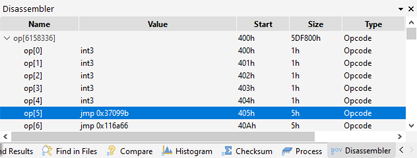
After the disassembler is run, the results are displayed in the Disassembler tab of the Output Window as a Table (shown above). The disassembled assembly language instructions are displayed in the Value column and selecting a row in the table selects the bytes that correspond to that instruction in the Hex Editor. The format for the Start and Size columns can be controlled by right-clicking on a cell in the column as described in the Working with Template Results help topic. The Name column lists the number of each Opcode starting from zero. Note that in the first row of the Name column the array size listed is the number of bytes disassembled, not the number of opcodes generated. 010 Editor does not currently have the capability to execute the produced disassembly and to do this a separate emulator or debugger tool should be used. Right click on the table and select Clear to clear the disassembler results or press the Esc key while the table is focused to hide the window.
Disassembly in Templates
Disassembly can done in Templates and for more information see the separate Disassembly in Templates help topic.
| 


