Highlighting allows applying colors to a text or hex file if it matches a certain set of bytes, shorts, a regular expression, or a find expression (a short is a group of two hex bytes). For example, with highlighting all of the bytes with values 128 to 255 could be colored to identify non-ASCII bytes, or all occurrences of the word 'BEGIN' could be highlighted. The Highlight Options dialog can be accessed by clicking the 'Tools > Options...' menu option and selecting Highlights from the list, or clicking 'View > Highlighting > Edit Highlights...'. Highlights can be turned on or off by clicking on them in the 'View > Highlighting' menu.
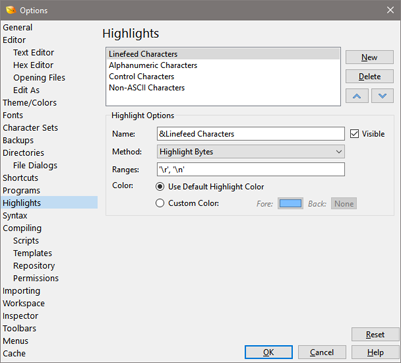
All available highlights are displayed in a list at the top of the dialog. Click New to generate a new highlight, or select an item in the list and click Delete to remove the highlight. Clicking the up or down arrows will change the selected item's position in the list.
When a highlight is selected from the list, its details will be displayed in the Highlight Options box. The name entered in the Name field will appear on any menu where the highlight will be accessed. If the Visible toggle is turned off, the highlight rule will not appear on any menus. If the Method drop-down list indicates Highlight Bytes, the Ranges field contains which byte values will be highlighted by this rule (values range from 0 to 255). Enter a value in any of the available numeric formats (see Introduction to Number Systems). Multiple values can be separated by the ',' character, or a range of values can be specified using '..'. For example, '0..31,127' will highlight bytes 0 to 31 inclusive, and 127. If the Method drop-down list specifies Highlight Shorts, enter the range of Shorts to highlight in the Ranges field (values range from 0 to 65535). Note that a Short is a group of two hex bytes in a file and how the Shorts are interpreted depends upon the current Endian of the file. Use the Highlight Shorts method when applying coloring rules to Unicode files.
If Method is Regular Expression / Find Expression, then enter a
regular expression or Find expression in the Expression field. Any occurrences of the expression will be colored in real time as the file is edited. Any supported regular expression can be used; for example, use 'BEGIN|END' to color both 'BEGIN' and 'END', or use '\d+' to color any number. By default the Expression is assumed to be a regular expression, but can be any Find expression by using a type specifier after the expression. For example, use '5F 34,h' to search for the hex bytes '5F 34'. A list of all type specifiers is given at the top of the Using Find help topic. Use the Match Case and Whole Word toggles to change whether the regular expression or find expression matches case or whole words.
Highlights can either apply colors to individual files, or can be set to color all files that use a particular Edit As (see Using Edit As for more information). If Scope is set to Apply to individual files then turning on or off the highlighter only affects the current file. If Scope is set to Apply to all files that use an Edit As then turning on or off the highlighter affects all files that use the current Edit As.
The bytes in the current file that match this highlight rule will be colored. If the Use Default Highlight Color toggle is enabled, the bytes are colored according to the Highlighting color in the Theme/Color Options dialog. Click the Edit button to see the current color and note that different colors are applied depending upon if the file is being viewed in the text or hex editor. If the Custom Color toggle is enabled, the bytes are colored according to the Fore and Back color boxes. Using custom colors, multiple highlights can be turned on at the same time using different colors.
The following Highlight rules are available by default:
- Linefeed Characters - 0x0d and 0x0a
- Alphanumeric Characters - all letters and numbers
- Control Characters - any of the bytes from 0 to 31 and byte 127
- Non-ASCII Characters - any of the bytes from 128 to 255
- Zeros - just the byte 0x00
Highlighters can be created in the Find Bar by clicking the arrow beside the All button and choosing Add Highlighter. In older versions of 010 Editor, Syntax Highlighting was performed through the Options dialog. If any old custom Syntax Highlighters are found, the Export Old Syntax Highlighter button will appear and clicking on this button allows exporting an old syntax highlighter to an XML file. See the Syntax Highlighting help topic for more information about syntax highlighters. Click the Reset button to restore all Highlight rules to their original values.
|